Food Fables
Kitchen Hacks
- While making paste from poppy seeds, soak it in hot water for half an hour, add salt, green chillies and 2-3 uncooked rice to avoid it going bitter. Same applies for making mustard paste. and while making mustard paste add poppy seeds also to make it a cilantro mild.
- You can keep an apple inside a bag with potatoes to stop the potatoes from budding
- You can add a pinch of salt while boiling eggs, so that they don’t crack and you can take off the coat easily
- Roll lemons between your palm and a solid surface in room temperature so that they yield the maximum juice
- If your recipe demands boiled or steamed shrimps, use this trick to keep shrimps from getting hard while boiling- heat water and add the shrimps when the water starts to boil. Then minimise heat and cover the pot for a little while before taking the shrimps out of the water.
- While boiling milk, keep some moisture at the bottom of the utensil
- Also while boiling milk, always keep a spoon or a spatula in the utensil at low heat
- Add around half tea spoon of sodium bicarbonate to the milk so that it doesn’t go bad, even if you forget to keep it inside the refrigerator
- Want the blades of your mixer to remain sharp? Put salt and grind in once every month.
- Don’t want to cry while cutting onions? Halve them and keep them in water for 15 minutes
- If you want to keep onions fresh, wrap them individually in nnewspapers and store them in dark places
- Keep a watch from the oven window rather than opening the door everytime
- Apply a paste of sodium bicarbonate inside the oven and keep it in low heat for 30 minutes. You will be easily able to remove dry food items
- To make yogurt at home, we normally mix a little yogurt in warm milk, cover the vessel and keep it overnight. But if you whip the yogurt and milk well while mixing, then the yogurt will set very well, and you will get a thick and tight yogurt.
- If you cook something that has a strong flavour (like fish, meat, etc.) then the smell lingers in pan in which the dish is cooked. In order to get rid of this smell, add water, a little detergent and vinegar in that pan and bring to a boil first before washing the pan like you normally do.
- If any dish is accidentally over-salted, then you can put a slice of bread in it to soak in the saltiness.
- If cooked rice gets burnt while heating, then put a slice of bread in it to soak in the burn
Household tips
- To clean your glass top dining table, add lemon juice in water, dampen a soft cloth and wipe clean to remove all stains.The solution of warm water and baking soda is great for cleaning refrigerators, microwaves and other home appliances of same order.
- Once in a while, a cup of vinegar should be poured in the wash basins, sinks. This acts as de-clogging agent.
- Ever wondered what the 18/10 in steel utensils mean? The 18 refers to the chromium percentage and the 10 to the nickel.
- Insect Control:
- Ground cinnamon and spread to places where ants make a hideout
- Keep basils to prevent flies and mosquitoes
- You can also create a mixture of 1/3 cup of vinegar, 3 tsp of dish soap and some water and spray it everywhere. Ants will not come.
- In the evenings, just before dusk, pour a cup of boiling water in all the drains, sinks, wash basins. This will check cockroaches, mosquito-breeding ground.Do it frequently.
Table setting
How to do a basic table setting
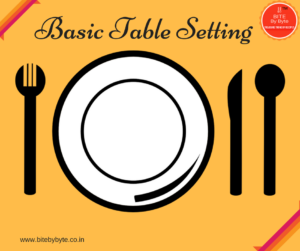
To lay the table in a basic setting remember to keep the Fork first, then the plate, in the right side will come the knife and then the spoon.
Also note that – The Knife blade should face the plate
Keep the napkin on the plate or keep it to the left of the fork
Knife and the bread butter plates are optional
Informal Place Setting
For an almost casual & informal menu consisting of three courses, this is how the table is laid –
- The soup course
- The salad or the first course
- The Entrée
- The Dessert
Dinner Plate – It is the most important thing. Usually napkin is placed on this.
The Two Forks: There are 2 kinds of forks. The bigger fork, ie the Dinner fork is kept along the left hand side of the plate. The fork which is smaller is used for eating salads etc. It is placed to the rigT of the bigger fork.
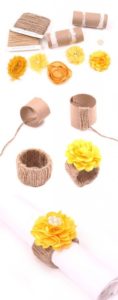
Napkin: The Napkins are often kept in napkin holders. However these are mostly kept on the dinner plate or sometimes under the forks.
Dinner knife: Dinner knife is usually placed on the right hand side of the table and its blade or sharp side should face the plate. In case of steak being served, a steak knife could be used.
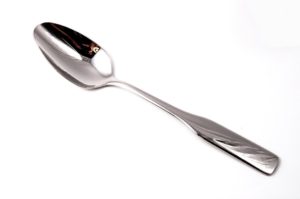
Spoons: Spoons are kept at the right side of the knife and the dessert spoon is kept at the left or the inside of the soup spoon.
Glasses: The drinking glasses are generally kept on the top right hand corner of the dinner plates.
Salad plate: A separate salad plate is a good idea in case it is runny. Thus this is kept at the left hand side of the forks.

Bread plate along with a butter knife: The bread plate is placed above the placement of the forks, with the butter knife being placed in a diagonal manner across the plate’s edge. The handle should be on the right side while the blade should be facing down.
Spoon & Fork for Dessert: The Dessert Spoon & fork could be placed above the dinner plate horizontally or beside the plate. If you want to put it beside the dinner plate, then it needs to be put on the left side, as it will be the last fork which was going to be used. The spoon in the similar manner will be put to the right side.
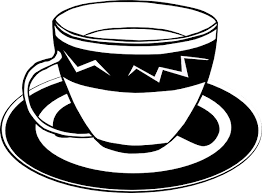
Cup & Saucer for Coffee – If coffee is served post dinner, then the cup & saucer should be kept to the right side of the knife and the spoon.
If its served at home, then the cups & saucers are brought to the table and then served.
Place Setting – Formal
The thumb rule for formal place setting is when things can be spaced in a geometrically manner. The centerpiece should be kept at the center with all the settings being made at an exact equal distance. You can keep the floral arrangements and other center pieces varied.
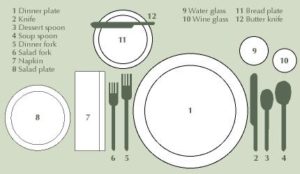
The utensils and cutlery should be placed in an order known as “outside in”
The setting described below is for a menu that includes:
- Shellfish as an appetizer
- Soup or fruits as a first course
- A course of fish
- A serving of salad
Service Plate: It is nothing but a big plate which is kept under the plate on which first course can be kept. It is also known as the charger.
Service plate remains on the table after the completion of first course. It remains there until the arrival of the entrée, when the dishes are exchanged.
This service plate can be used for many courses.
Butter plate: Butter plates are kept at the table above the placement of forks. It’s thus kept on the left side.
Dinner fork: This fork is also called Place fork. It is the largest fork and is placed towards the left side of dinner plate. The other forks which may be needed for other courses are generally kept to the left hand or the right hand side of the dinner fork.
Fish fork: fish knife is kept towards the dinner knife’s right hand side
Salad fork: After the entrée if a salad is to be served, a small fork called the salad fork is positioned next to the plate, on the right side of the dinner fork. If salad is served before the fish course, then forks would have been arranged in the following order, from left side to right side: salad fork then fish fork, and finally dinner fork.
Dinner knife: On the right side of the dinner plate, the large dinner knife can be placed.
Fish knife: Fish knife that has a special shape and is placed on the right side of the dinner knife.
Salad knife: In case a salad is served first followed by the fish course, then the arrangement of knives would as follows (left side to right side): dinner knife then fish knife followed by salad knife.
Soup spoon or fruit spoon: When fruit or soup is served as the first course, the designated spoon should be placed on right side of all the knives.
Oyster fork: When shellfish is a part of the menu then the oyster fork can be set on the right side of all the spoons. It should be noted that this is the only fork that can be arranged on the right side of the spoon.
Butter knife: It is a small spreader that is placed diagonally over the top of the butter plate, with the handle being on the right side while the blade placed in a downward fashion.
Glasses: the number of glasses can go up to 5. There placement is such that all the smaller glasses can be placed in the front. Water goblets are arranged above the placement of the knives. On the right is the champagne flute; in front of which a red and/or white wine glass as well as a sherry glass can be placed.
Napkin: The placement of the napkin is always on the top of the service plate (provided one is being used). In absence of a charger, it is placed in the space of the plate.
In general:
Knife blades need to be placed with the cutting edge facing towards the plate.
Not more than three of the implements can be placed on the table, except for the occasion that an oyster fork is being used along with the other three forks.
In case there are more than three courses before dessert, then the utensil for the fourth course is always brought in along with the food; likewise the salad fork and knife may be brought in when the salad course is served.
The dessert forks and spoons can be brought in placed on the dessert plate before the serving of the dessert.
Place used utensils on your finished plate parallel with each other at the four o’clock to ten o’clock position. Any utensils necessary for dessert will arrive with the dish when served.
If a knife is used to cut food into smaller pieces, cut only one or two bites at a time.
If you need to step away during a meal, fold your napkin informally and place it to the left of your place setting. Alternatively, you may place the napkin on your chair, but not if the napkin is soiled.
“Keep your elbows off the table!” “Sit up straight!” Your mother was right!
When in doubt, follow the lead of your host and hostess.
How to use Cutlery?
- Knives should be held in the right hand. Major part of the knife’s handle should be in your palm. Thumb should be pressed against the handle’s top left side and the index finger needs to be placed on the top of the blade’s first part with the sharp portion facing down.
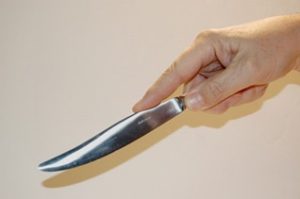
Image Source: Google
- Forks can be used in various ways:
- Forks can be used with a knife or spoon. In this case, the fork needs to be positioned in your left hand facing down with the handle being held in your palm. The thumb should be pressed on the right side of the handle top and your index finger needs to be pressed on the arch of the points. You should never hold your fork in clenched fists.
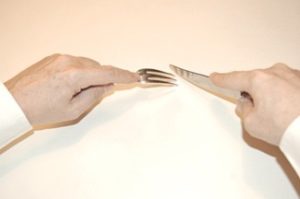
Image source: Google
- If you are using the fork by itself then it should face in an upward direction with the top of the handle being placed in between the tip of your third finger and index finger. Middle of the handle should be held by the thumb while the remaining portion of the handle should be rest in the ‘V’ formed by your forefinger and thumbs.
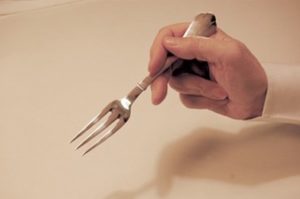
Image source: Google
- Position of holding a spoon is similar to that of a fork, when the fork is used alone. It should be held in between your third finger and index finger in an upright position. It is held down with the help of your thumb that rests on handle’s other side. While eating or sipping anything from the spoon, remember to do so from the spoon’s left side and not the front.

Image source: Google
POSITION OF CUTLERY WHILE EATING
- During main course, largest fork should be held in the left hand. When trying to cut something, make sure the face of the fork points in a downward direction.
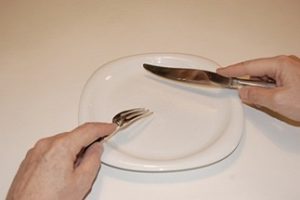
Image source: Google
- When you no longer need the knife, set the knife down and hold the fork as mentioned in the earlier segment. Americans usually place the knife in a diagonal position over the plate’s upper-right edge. Then take the fork in the right hand to continue with the meal.
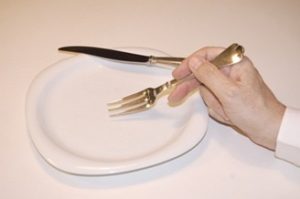
Image source: Google
- While having dessert, the spoon should be held in the right hand while position of the fork should be in the left hand with the pointed edges facing a downward direction.
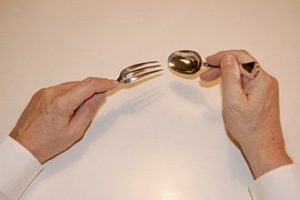
Image source: Google
- If you pause in between your meal then place your fork with your knife with an angle to the right of the fork. Whether you are using just the fork or fork and knife, instead of placing them on top of your food, place them on the plate that is on the far ride side of your plate.
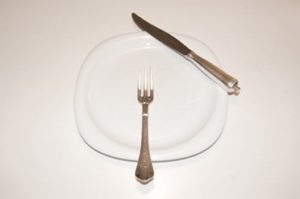
Image source: Google
- Once you finish your whole meal, appetizers, main course as well as the dessert, fork and spoon should be placed in a six-thirty position with the tips facing top of the plate. Same for dessert spoon and fork as well.
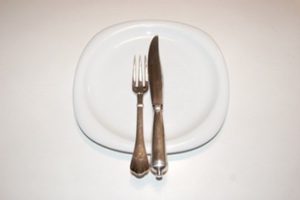
Image source: Google
- The above mentioned placement of fork and spoon upon finishing meal is the British way. Americans on the other hand prefer a four-twenty position. Both positions are correct.
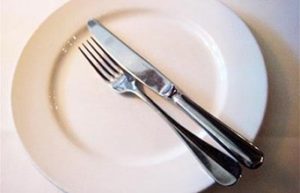
Image source: Google
- For left handed individuals, the instructions need to be reversed as to which hand should hold your knife, fork and spoon.
Tips for the Meal Time
- Bones, pits, and “oddities” sometimes land in our mouths during a meal. The rule of thumb is if a salad olive has a pit, it may be removed from your mouth onto your fork and placed back onto the salad plate. If the piece of food has been chewed, discreetly dispose of it in your napkin.
- Your napkin should be on your lap at all times during a meal when not in use. You can dab your mouth with this napkin when needed. The napkin, however. Should not be used for wiping face or blowing your nose. If you need to do either, excuse yourself and head for the restroom.
Basic Table Etiquette
The basic table etiquette should be maintained as that ensures the comfort of both guests and host when seated at the table. The knowledge of table manners is just a matter of having basic common sense. Whether you are at a formal dinner or enjoying a night of poker with your friends, your table manners will help you to get through the situation.
- Your posture while sitting should be straight. You should make it a point so as to not slouch or lean back in the chair.
- If your mouth is full of food then try not to speak. It is quite unpleasant for anyone to see balls or pieces of chomped up food in your mouth. If it a necessity that you speak at that exact moment when your mouth is filled with food, then tuck it in your cheek using your tongue and speak briefly. This can happen only if you have had a small bite of food, otherwise you need to wait until you have finished.
- If you make slurping noises it is quite distracting and unpleasant so try to chew without making any sounds.
- Take small bites of food. If your bites of food are small then all of the above mentioned etiquette can be maintained easily. Meat and salad should be cut up so that it does not hang out once it has been placed in your mouth.
- Remember meat should not be cut up all at once. The messiness associated with this kind of activity might not be liked by the people around the table.
- Do not eat your food at a fast pace. Maintain a leisurely pace. Following this rule is not only speaks of good table manners but also is good for digestion. Eating your food quickly can be a sign of disrespect towards your host.
- Utensils and cutlery like knives should not be waved in the air, especially if there is food on it. Apart from the fact that it can cause damage, another fact is that though it might show your exuberance but it is still not considered to be a good table manner.
- Elbows should not be on the table. If you need to lean on the table then take a roll or something like a piece of bread in your hand and place the length of your forearm on the table.
- Never reach over to get something on the table. As it might cause damage to glasses but you could also run your sleeves through someone else’s plate of food.
- Never forget to say please and thank you. These words fall under common courtesies that should be known to all.
- If you need to leave the table for some reason, always excuse yourself. Otherwise some may consider that you do not like their company. You should always make them feel that you would rather be at the table but the reason for leaving is so pressing that it needs to be attended as soon as possible.
- Compliments should always be made for the cooking. Although the food might be awful it is a good mannerism to say something nice to the cook.
- Your mouth should be wiped before you drink so as to not leave any smudges on the edge of the glass.
Q: What should I do if I spill something?
A: A minor accident at the table is bound to happen on occasion. If you are the cause make your excuse politely and only once, then proceed to help the host to clean up the mess. If your guest makes an inadvertent move that sends pudding onto his neighbor’s lap, attempt to make everyone feel at ease with the situation. Accept excuses, clean up the mess with minimal fuss.
Hot foods can create embarrassing situations. When confronted with hot foods, first be wary. If you do make the mistake of scooping up a mouthful of scalding casserole, then make the minimal fuss by swiftly taking a drink of water or some other cool beverage.
Tips for microwave cooking
- While cooking an assortment of vegetables, arrange large or tougher vegetables (carrots, cauliflower etc.) toward the outside of the dish and small or tender ones (peas, mushrooms etc.) in the centre so they finish cooking at the same time.
- Never boil an egg in the microwave. It will explode.
- Avoid using alcohol in puddings, which have to be micro-cooked, since it may catch fire.
- Season vegetables with salt after cooking them in microwave. Salting beforehand could leave brown spots.
- Always start with the shortest cooking time listed in the recipe, this way vegetables will not be over cooked. You can always cook it for some more time if required.
- During conventional cooking for liquid based recipes like cakes, soups and sauces use deeper dishes as they tend to increase in volume for a temporary period when cooked in a microwave oven.
- While cooking food items with a skin or any kind of coating or shell, you need to puncture the outer layer. Due to the piercing, the food is inhibited from exploding as the steam that is built up is released through the puncture.
- The container whose shape is oval or round is perfect for even heating of the food. Containers that have a rectangular or square shape have corners. Heat reaches these corners easily thus resulting in overcooking of food in those parts.
- If food and grease gets on the inside of the microwave oven. Two tablespoons of lemon juice needs to be heated in a cup of water on high power for 2 to 3 minutes until it boils. Do not open the door for another five minutes so the vapors of this liquid helps lift the tough from the surface inside the microwave.
- Just as heating lemon juice in the microwave helps to get rid of tough grit and grime, it can also help get rid of stubborn odors. Mix half a cup lemon juice with 1 – 2 cups of water. Heat on high for approximately 5 minutes after covering it. Cool the mixture before removing it. For really stubborn odors, you could repeat this step as necessary. A whole lemon could be used along with the rind.


